We create altered game art from dominoes to jigsaw pieces and beyond...If it's a Game we Alter it! Come & play in our monthly challenges and fun events throughout the year!
Showing posts with label Cards featuring Altered Game Pieces. Show all posts

Tuesday, March 6, 2012

New DMT Challenge for March - The D'ART Stenciling Technique!

Greetings Dominoians!

It's time for March's DMT which stands for DominoART's Monthly Technique!
This month I challenge you to try using a stencil or a template to create a design on a domino or any other similar game tile!  I'm calling this one the "D'ART Stenciling Technique".


Play around with all the possibilities and have fun experimenting with this concept.  Then create something with your altered game tile - add it to a card, a tag, an ATC or make a piece of jewelry with it.  Then share your experience and project photos on the DominoART Yahoo Group or the DominoART Facebook Page.

If you have a blog and post your project there then please use the inlinkz button below to share your project with us all here on the DominoART Blog - you must mention the D'ART Stenciling Technique Challenge and link back to us here!  It's a text only set up so no thumbnail pics will appear.  Please only use the direct URL to your project and not just a general link to your home page, any general links will be removed.

If we get enough interest in this months DMT then I will have a prize up for grabs!
So please come and play with us, the more the merrier!
Here's my project featuring the Mini Numbers Collage Template by Crafter's Workshop which was provided by Blockheads Paper Arts.

Numerology DominoART Card

The theme for my DominoART card is Numerology which is a branch of knowledge that deals with the occult significance of numbers.  I had a ball playing around with the various elements and think this card would be suitable for someone who is into Numerology or just as an all occasion card.  You could really personalize it to a number or a date that is significant like a birthday, anniversary or a graduation date.  The possibilities truly are limitless!


Trace the outline of the Mini Numbers Collage onto the domino with an ultra fine black Sharpie marker and colour in the numbers.  You don't have to use a Crafter's Workshop Template for this challenge.  Just experiment with any kind of stencil or template you have already but you might want to check out all the awesome Crafter's Workshop Templates available from Blockheads Paper Arts though coz they've got some really nice ones ;0)


Apply metallic silver Rub-ons cream to the sides and the edge of the domino and seal with a couple of light mistings of Krylon Artist's Workable Fixative spray.  Apply black glitter glue to the numbers you wish to highlight.


In the photo about you can see the metallic silver sides and the dimension of the glitter glue.


Make a folded card from black cardstock while you wait for the glitter glue to dry on the domino.
To create the mini numbers collage background ink up the back of the template with Versamark Watermark ink.  Apply the ink directly to the template with the ink pad and be as generous as possible with the ink so the template is nice and wet.  Lay the template ink side down onto the black cardstock and cover the template with a piece of paper towel to protect your brayer.  Roll the brayer across the template multiple times with a nice even firm pressure.  Apply silver Perfect Pearls powder to the wet ink.

 I've been experimenting with Crafter's Workshop Templates for Blockheads Paper Arts' design team using various products to create interesting backgrounds and effects.  I've got a few projects up on my blog at Leigh SB Designs if you want to check them out too!


Emboss a piece of semi-glossy black cardstock with a Cuttlebug numbers embossing folder.  Cut a narrow panel and then apply a light coat of metallic silver Rub-ons cream to the embossed numbers and to all four edges of the panel.


Adhere the embossed panel to the card front with double-sided tape.  Add a metallic silver border sticker down the left hand side of the card leaving a narrow black border on the outer edge.


Adhere the domino to the card front with glue dots.


Embellish the upper portion of the card with silver cord wrapped around the card three times and tied in a knot.  Finish off with silver beads and knot the ends of the cord.

I put some thought into how I designed this card and you might have noticed that I emphasized certain numbers in subtle ways ;0)  The number 3 is important - I used 3 different surfaces, the cord is wrapped 3 times, the large number 3 is prominent, 2 x 3 = 6 and 3 x 3 = 9.  Which also picks up on the 2 and 9 on the domino, the 2 on the background panels and the 2 beads.  The number 5 is also prominent...how you are wondering?  Well 2 + 3 = 5 and also 1 - 6 = 5 of course, which you can see on the right hand side of the card ;0)  The domino itself is significant coz 2 + 9 = 11.  The number 11 has followed my sister around her entire life and hence has become an important number in our family and certain things have happened on that date or time in recent years and that's why I chose to use that part of the stencil!

I really enjoyed making this project and hope you will enjoy creating your own Stencil inspired artwork and enter your projects in the D'ART Stenciling Technique challenge!

Domino Hugs!
THE SHARPIE DOMINO QUEEN


Sunday, October 23, 2011

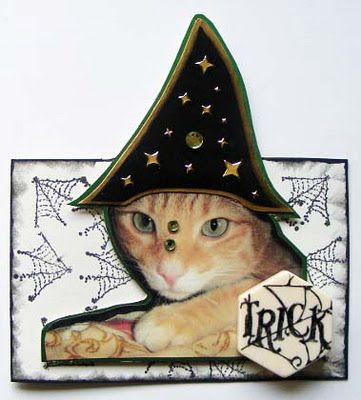
Day 23 of 31 Days of Halloween - 'Mango The Wizard' Card featuring a Chekit Game Tile by Paula S-M

 Welcome to Day 23 of 31 Days of Halloween!

Paula S-M is my precious Sissypoo and also a moderator and active member of our DominoART Yahoo Group!  Paula is here today to share her spooktacular card creation that combines photography with an altered Chekit!


Paula used a photo of her stunning kitty, Mango, as the star of her mixed-media Halloween card.  She made a folded card from white cardstock and stamped the spiderweb (Inkadinkado) with Coal Black Ancient Page dye ink randomly to create the background.  She then distressed the edges of the card with Black Soot Distress Ink which she applied with an Ink Applicator.

She printed out a photo of her kitty and cut it out.  She then made a wizard's hat from black cardstock and edged it with a metallic gold paint pen.  She adhered the hat to the kitty with permanent adhesive tape and then adhered the entire panel to green cardstock which she then closely trimmed to follow the outline of the image.  She then adhered the panel to the folded card with permanent adhesive tape and embellished the hat with gold star stickers and a self-adhesive rhinestone.


She stamped the word 'Trick' (Inkadinkado) onto a Chekit game tile with Coal Black Ancient Page dye ink and heat set the ink with a heat gun.  She sealed the game piece with a coat of matte varnish.  Paula completed her card with two more rhinestones on the kitty.  Soooo cute!!!

Stay tuned for Day 24 to see what Jennifer W has cooked up in her cauldron for you!

Domino Hugs!

THE SHARPIE DOMINO QUEEN

Saturday, October 15, 2011

Day 15 of 31 Days of Halloween - Witchy Elegance by Val S

Howzit Stamping Friends!
Woohoo!  We're half way through our Spooktacular 31 Days of Halloween event!
I hope everyone is enjoying all the eye-candy!

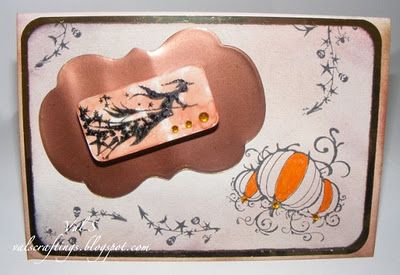
Val S, moderator of the DominoART Yahoo Group and my Mom, is sharing this stunning Halloween card featuring an altered domino with you today!


 Val used white cardstock for her project and created the subtle background with a Big and Juicy Mountain Meadow ink pad.  The card is framed with Gold Mirror cardstock.  All the stamps are by Inkadinkado and she used Memento Tuxedo black to stamp all the images.  She used an orange Glaze Pen to colour in sections of the pumpkins and embellished with Amber gems.

Val got her 'Green' action on by recycling a beer can and used a Spellbinders Label die to cut out the metal mat for her domino.  She then coated the metal with Versamark ink and embossed with copper embossing powder and heat set with a heat gun.  She repeated this process 3 times to achieve that stunning copper metal finish.

Val used a standard white domino as the feature of her creation and altered it with Terracotta Adirondack Alcohol Inks.  She then stamped the witch with Ancient Page Coal Black ink and instead of heat setting the ink she embossed with clear embossing powder and sealed the domino with Judikins Diamond Glaze.  She embellished the domino with self-adhesive Amber gems and adhered the domino to the metal label with more Diamond Glaze.
Check out more of Val's creations on her new blog, Val S Craftings!

Stay tuned for Day 16 to see what Pilar F has cooked up in her cauldron for you!

Domino Hugs!

THE SHARPIE DOMINO QUEEN
Monday, October 10, 2011

Day 10 of 31 Days of Halloween - 'Happy Halloween' Easel Card featuring an Altered Domino by Val S

Happy Monday Everyone!
If you're not a fan of Mondays then maybe this gorgeous project by Val will help cheer your day up a bit!  Val S, moderator of our DominoART Yahoo Group and my Mommsie, is sharing another fabulously spooktacular easel card today!


She used plain white cardstock to form the easel card base and did all her stamping on Silk smooth card by Inkylicious for the main panels.

She used a Big and Juicy ink pad, Mountain Meadow, and an Ink Applicator to create all the backgrounds.  Once the ink has dried buff over the card with kitchen roll.  This gives the Silk cardstock a really nice luster.

The Window stamp, Clarity Stamps, was stamped with Memento Tuxedo Black and coloured with Cinnamon Promarker permanent pen.  

FYI:  Promarkers by Letraset are the UK equivalent to Copics and Marvy Le Plume Permanent markersBlockheads Paper Arts is now stocking both Copics and the new Marvy Le Plume Permanents!

Val stamped the images by Inkadinkado with Memento Tuxedo Black onto the easel panel and embossed with clear embossing powder.

She then altered a standard white domino by applying Current Adirondack Alcohol Ink with an Ink Applicator and stamped the sentiment onto the domino with Ancient Page Coal Black and also embossed it with clear embossing powder.  She finished off her easel card with Amber and Purple rhinestones.
 
Stay tuned for Day 11 to see what Pilar F has cooked up in her cauldron again for you!

Domino Hugs!

THE SHARPIE DOMINO QUEEN
Thursday, October 6, 2011

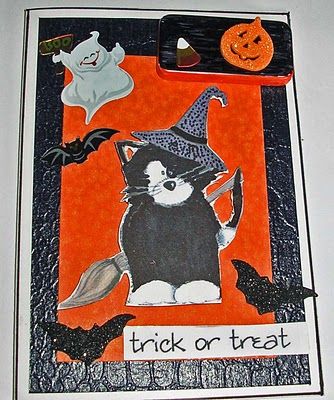
Day 6 of 31 Days of Halloween - Trick or Treat card featuring a domino embellishment by Pat C

Howzit Stamping Friends!
I hope everyone is enjoying our 31 Days of Halloween extravaganza so far!
 Pat C is 85 years young and an active member of our DominoART Yahoo Group and has been stamping and altering dominoes for about 2 years now!  See, it's never too late to start stamping ;0)

 Pat has this spooktacular Halloween card featuring a domino to share with you today!


Pat used a standard white domino and coloured it with black and orange Sharpie markers and used Halloween self-adhesive sticker embellies to decorate it.

She then made a folded card from black textured cardstock and adhered a patterned orange cardstock mat to the front of it.   She cut out the Witch Cat from a sheet of decorative paper (source unknown) then adhered it to the center of the card and finished with the various spooky embellishments.

Stay tuned for Day 7 to see what Pilar F has cooked up in her cauldron for you!

Domino Hugs!

THE SHARPIE DOMINO QUEEN

Monday, October 3, 2011

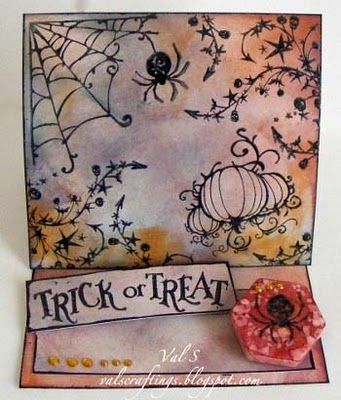
Day 3 of 31 Days of Halloween - Trick or Treat Easel CardFeaturing a Chekit Game Tile by Val S

Howzit Stamping Friends!

We are well underway with our spooktacular 31 Days of Halloween extravaganza!
Val S, aka my Mom ;0) and moderator of the DominoART Yahoo Group has this stunning Halloween easel card featuring a Chekit game tile to share with you today!

Val used white cardstock for her project and created that beautiful background with a Big and Juicy Mountain Meadow ink pad.

All the stamps are by Inkadinkado and she used Memento Tuxedo black to stamp all the images and embossed them with clear embossing powder.

Val used a Chekit, which is a domino-like game tile, for her creation and altered it with Adirondack Alcohol Inks Currant and Terracotta and blended the inks with Adirondack blending solution. She then stamped the spider onto the Chekit with Coal Black Ancient Page dye ink. She completed her easel card by embellishing the Chekit and the card with amber self-adhesive gems.
Check out more of Val's creations on her new blog, Val S Craftings!

Stay tuned for Day 4 to see what Sandra Y has cooked up in her cauldron for you!

Domino Hugs!

THE SHARPIE DOMINO QUEEN

Related Posts Plugin for WordPress, Blogger...