We create altered game art from dominoes to jigsaw pieces and beyond...If it's a Game we Alter it! Come & play in our monthly challenges and fun events throughout the year!

Friday, October 14, 2011

Day 14 of 31 Days of Halloween - 'One Spooky Evening' Square Domino Ornament by Leigh S-B

 Happy Day 14 of Halloween!

Today I'm sharing a hanging ornament I made from a Square Domino.  These dominoes are awesome game pieces coz they're double the width of a single standard sized domino.  But unfortunately the manufacturer of the Square doms has discontinued them so I apologize for getting you all excited if this is the first time you're seeing them!!  Booo!  Booo!  Booo to the people who used to make them!


SUPPLIES
Square Domino that you just might be lucky to find some where!
Rubber Stamp by PSX
Ancient Page dye ink pads:  Coal Black
Sharpie markers:  Yellow, Red, Orange, Purple, Brown
Silver Paint Pen
Judikins Diamond Glaze
Black Sharpie
Bat and pumpkin confetti
Black ribbon
Black fiber and cotton
Heat It embossing gun

For this project you're going to need a Square domino straight from the tin but if you can't get your hands on some then try playing with two dominoes glued together!  No surface preparation is needed because you're going to be using my 'Sharpie Domino Queen' Technique for all the colouring!  Stamp the image onto the domino with Coal Black Ancient Page dye ink and heat set.  Use Sharpies to colour in the entire design but use an extra-fine metallic silver paint pen on the moon.  Edge and colour the sides of the domino with a broad point metallic paint pen and seal the surface and the sides with a coat of Judikins Diamond Glaze.  While the glaze is drying cut a length of black fiber and a length of black cotton.  Thread the confetti bats and pumpkins onto the cotton and tie it onto the fiber at about the center mark.  Form a loop on one of the black fiber and tie a knot.  Apply a thin line of Diamond Glaze all around the sides of the domino and wrap the fiber around it.  Secure the other end at the top of the domino at the base of the loop with more glaze and let it dry.  Cut a length of black ribbon and tie a bow around the loop base and this will also help secure the glued end in place.

Want to see more of my 'Sharpie Domino Queen' Technique projects then check out my blog, Leigh S-B Designs too!

Stay tuned for Day 15 to see what Val S has cooked up in her cauldron for you!

Domino Hugs!

THE SHARPIE DOMINO QUEEN

Thursday, October 13, 2011

Day 13 of 31 Days of Halloween - 'A Jolly Halloween' by Monica G

Happy Day 13 of Halloween Everyone!

Monica G, an active member of our DominoART Yahoo Group, joins us today to show off her stunning 'A Jolly Halloween' vintage style altered domino!


She used the following supplies to create this piece:
Alcohol Inks
Vintage postcard image
Sticker Numbers
Assorted Rhinestones
and Microbeads embellish the sides of the domino.

 Stay tuned for Day 14 to see what I have cooked up in my cauldron again for you!

Domino Hugs!

THE SHARPIE DOMINO QUEEN

Wednesday, October 12, 2011

Day 12 of 31 Days of Halloween - Boo TagART featuring an Altered Domino by Pat C

Happy Day 12 of 31 Days of Halloween Everyone!

Pat C is back today to share her spooktacular TagART featuring an altered domino!


Pat used a Promarker Gold Pen, Green Gel Pen, Black Sharpie and Gold Glitter to
alter the domino and embellished it with the Boo self-adhesive sticker.

Stay tuned for Day 13 to see what Monica G has cooked up in her cauldron for you!

Domino Hugs!

THE SHARPIE DOMINO QUEEN

Tuesday, October 11, 2011

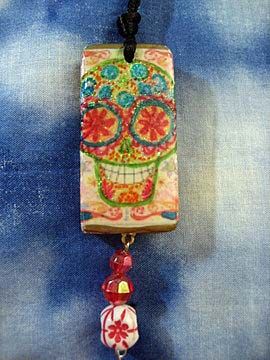
Day 11 of 31 Days of Halloween - Day of the Dead Domino Pendant by Pilar F

 Howzit Dominoians

It's Day 11 of our 31 Days of Halloween event and Pilar F is back today to share her freakish 'Day of the Dead' Skull Pendant made from an altered domino.


She drilled holes into the domino for the cord and beaded dangle.  The sugar skull graphic is decoupaged on to the domino and coloured with Sharpie markers and Sparkle Glaze.  She sealed the piece with a coat of crystal lacquer.   Pilar finished off her creation with a beaded dangle.

Stay tuned for Day 12 to see what Pat C has cooked up in her cauldron again for you!

Domino Hugs!

THE SHARPIE DOMINO QUEEN

Monday, October 10, 2011

Day 10 of 31 Days of Halloween - 'Happy Halloween' Easel Card featuring an Altered Domino by Val S

Happy Monday Everyone!
If you're not a fan of Mondays then maybe this gorgeous project by Val will help cheer your day up a bit!  Val S, moderator of our DominoART Yahoo Group and my Mommsie, is sharing another fabulously spooktacular easel card today!


She used plain white cardstock to form the easel card base and did all her stamping on Silk smooth card by Inkylicious for the main panels.

She used a Big and Juicy ink pad, Mountain Meadow, and an Ink Applicator to create all the backgrounds.  Once the ink has dried buff over the card with kitchen roll.  This gives the Silk cardstock a really nice luster.

The Window stamp, Clarity Stamps, was stamped with Memento Tuxedo Black and coloured with Cinnamon Promarker permanent pen.  

FYI:  Promarkers by Letraset are the UK equivalent to Copics and Marvy Le Plume Permanent markers!  Blockheads Paper Arts is now stocking both Copics and the new Marvy Le Plume Permanents!

Val stamped the images by Inkadinkado with Memento Tuxedo Black onto the easel panel and embossed with clear embossing powder.

She then altered a standard white domino by applying Current Adirondack Alcohol Ink with an Ink Applicator and stamped the sentiment onto the domino with Ancient Page Coal Black and also embossed it with clear embossing powder.  She finished off her easel card with Amber and Purple rhinestones.
 
Stay tuned for Day 11 to see what Pilar F has cooked up in her cauldron again for you!

Domino Hugs!

THE SHARPIE DOMINO QUEEN

Sunday, October 9, 2011

Day 9 of 31 Days of Halloween - 'Skeleton' Wood Domino Ornament by Sheryl G

Howzit Stampers!

Sheryl G is a member of our DominoART Yahoo Group and has joined us today to share her wonderful jazztacular (yes, I just made that word up) 'Skeleton' hanging ornament made from two wooden dominoes!  Sheryl has included her written steps in the actual photos and here's her supplies list!  Click on the photos to enlarge them!

Thanks for sharing your jazzy creation with us Sheryl!

click to enlarge
SUPPLIES
* two black dominoes 
* rubber stamps from Michaels and Judith
* Pattern paper from Provo Craft
* liquid adhesive for paper from AC Moore
* VersaMark Ink
* Stampendous black embossing powder
* heat gun
* Clear glaze from All Night Media
* beads for hanging from Wal-Mart
* Braided Cord from Horizon

Stay tuned for Day 10 to see what Val S has cooked up in her cauldron for you!

Domino Hugs!

THE SHARPIE DOMINO QUEEN

Saturday, October 8, 2011

Day 8 of 31 Days of Halloween - WitchyBoo Nightmare Catcher by Leigh S-B The Sharpie Domino Queen!

 Happy Day 8 of DominoART's 31 Days of Halloween!

Today I'm sharing a project I designed a few years ago for Leigh's Altered World of Game Pieces which was a featured part of The Stamper's Mall monthly ezine.


SUPPLIES

Super-sized white domino
Rubber Stamps:
Cat face - partial image by Sonlight
Man with clock - source unknown
Black cats - source unknown
Dancing skeletons - source unknown
Graveyard Ghost - PSX
Halloween balloon - portion of a cat stamp by Penny Black
Adirondack Alcohol Inks:  Butterscotch, Lettuce, Caramel, Terracotta
Ancient Page dye ink pads:  Coal Black, Lemon Peel, Mandarin and Chocolate dye
Squiggle and triangle confetti
Opaque orange and Black seed beads
Mini domino bead
20 and 24 gauge black wire
Black feathers, chenille stems (2 kinds) and Felt
Aleene's Fast Grab glue
Judikins Diamond Glaze
Black Sharpie
Stipple brush
Krylon Artist's Workable Fixative
Round nose pliers and Wire cutters
Brass paw charms
PrismaColor Pencils
White cardstock
Black/Silver chain
Scrap piece of ribbon
Glue Dot strips
Mini black brad
Piece of gold fiber
Tiny hole punch
Alphabet beads
Scissors

The Kitty Domino Doll!

For this project you're going to need a super-sized domino straight from the tin, no surface preparation is needed.  Alter the domino with Alcohol Inks and an Ink Applicator to create the Polished Stone effect.  Colour the sides and a narrow border on the front of the domino (side with the dots) with a black Sharpie marker.  Seal the domino with a coat of Krylon Artist's Workable Fixative.  Randomly glue squiggle and triangle confetti onto the polished stone surface to add a bit of sparkle.

Cut a length of 20 gauge black wire and wrap it around the sides of the domino to form a basic frame for the 'Nightmare Catcher'.  Wire wrap the spokes of the web in 20 gauge wire.  Make sure it fits snuggly around the domino and then wrap the two ends of the wires together at the base of the
domino.  Remove the frame and create the filigree of the web with 24 gauge wire.  Randomly thread on orange seed beads as you form the web.  Don't cut off the excess wire yet!  Now wrap black feathers around the frame and secure them in place with the 24 gauge wire.  I made sure I finished adding the feathers at the top of the domino because I then attached the chenille stem 'arms' and a chenille loop to the top of the domino with the same wire.

To make the arms I used a stem of black chenille that varies in size from thin to thick and then again.  I cut it so that I had to puffy sections and to thin sections (thin being the wrist parts).  I then bent it in the middle and attached it to the domino.  I also formed a loop with a regular chenille stem to form the armature for the cat's head.


 I inked the cat face portion of a stamp with black dye ink and stamped it onto white cardstock.  I coloured the face with PrismaColor color pencils and cut out the face.  Edge the sides of the cut out and colour the back with a black Sharpie.  I also added a bit of detail to the image with a
black Sharpie.  Then coat the entire face with a thin layer of Judikins Diamond Glaze.

Measure out a length of black/Silver craft chain for the legs of the doll and cut with wire cutters.  Wire wrap paw charms to the ends of the chain and attach the tops to the web frame.  Push a paw charm onto the end of each chenille arm and loop the ends of the wire back with pliers to secure the
charms in place.

Add a loop of chain to the top of the web frame so the doll can be a hanging decoration.  Embellish the base of the web with the word 'BOO' in alphabet beads by attaching them with wire.  Run a thin line of Fast Grab glue around the sides of the domino and press the web frame onto the domino, pressing the wire to ensure a snug fit and let it dry.

Adhere the cat face to the chenille loop at the top of the domino with Fast
Grab glue and let it dry.


The Nightmare Book!

Cut a piece of white cardstock slightly smaller than the size of the domino and accordion fold into four sections.  Stamp the images with black dye ink. Colour by stippling dye inks onto the cardstock with a stipple brush.  Add a bit of detail to make some of the images stand out more than others with a black Sharpie.  Edge the decorated side and colour the reverse with a black Sharpie - you don't need to colour the entire side black, just the edges that are visible when the book is folded.  Punch a tiny hole into the right hand side of the front cover and attach a mini black brad - this is the closure for the book.  Then glue a piece of scrap ribbon over the spine of the book for a more finished look.

Press a glue dot strip to the middle of the domino and adhere a length of gold fiber to it - the tail of the fiber must stick out the left hand side of the domino.  Add a small amount of Fast Grab glue to the back cover of the book and adhere to the domino and let it dry.  The gold fiber then loops around the brad a few times to close the book.  Embellish the fiber end with 2 black seed beads and a chunky white bead that looks like a little domino.


Now the kitty needs a witch's hat to be a witch.....

Cut a witch hat shape out of piece of black felt.  Cut a matching triangle out of the same felt and glue the two pieces together with Fast Grab glue and embellish with a squiggle confetti.  The little witch hat then slots over one of the cat's ears.

This Kitty Domino Doll is now officially a WitchyBoo Nightmare Catcher
complete with a mini book of all the nightmares she's rescued us from!  
Pleasant dreams :0)

Stay tuned for Day 9 to see what Sheryl G has cooked up in her cauldron for you!

Domino Hugs!

THE SHARPIE DOMINO QUEEN

Friday, October 7, 2011

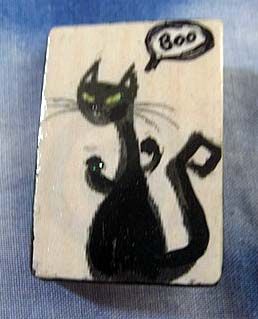
Day 7 of 31 Days of Halloween - Rummicub Black Cat Pin by Pilar F

Howzit Stampers!

Pilar F, active member of our DominoART Yahoo Group, is back today with a spooky Black Cat pin made from a Rummicub tile!


She decoupaged the Cat graphic on to the tile and applied a coat of sealer.
Once the sealer was dry she glued a pin back on to the 'front' of the tile.

Stay tuned for Day 8 to see what I've cooked up in my cauldron for you!

Domino Hugs!

THE SHARPIE DOMINO QUEEN

Thursday, October 6, 2011

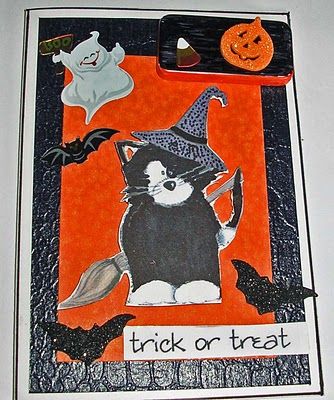
Day 6 of 31 Days of Halloween - Trick or Treat card featuring a domino embellishment by Pat C

Howzit Stamping Friends!
I hope everyone is enjoying our 31 Days of Halloween extravaganza so far!
 Pat C is 85 years young and an active member of our DominoART Yahoo Group and has been stamping and altering dominoes for about 2 years now!  See, it's never too late to start stamping ;0)

 Pat has this spooktacular Halloween card featuring a domino to share with you today!


Pat used a standard white domino and coloured it with black and orange Sharpie markers and used Halloween self-adhesive sticker embellies to decorate it.

She then made a folded card from black textured cardstock and adhered a patterned orange cardstock mat to the front of it.   She cut out the Witch Cat from a sheet of decorative paper (source unknown) then adhered it to the center of the card and finished with the various spooky embellishments.

Stay tuned for Day 7 to see what Pilar F has cooked up in her cauldron for you!

Domino Hugs!

THE SHARPIE DOMINO QUEEN

Wednesday, October 5, 2011

Day 5 of 31 Days of Halloween - Goth Girl DominoART Necklace by Leigh S-B

Howzit Dominoians!

On the 5th Day of Halloween I'm here to share one of my DominoART Necklaces featuring my signature Sharpie Domino Queen Technique!


SUPPLIES
Standard White Domino
Sharpie Markers:  Black, Pomegranate and Slate Gray
G-S Hypo Cement Adhesive (look in the Other Glues section)
Jewelry Findings
Plaid Ribbon
Clear Swarovski Crystal

Stamp a portion of the Goth Girl onto the domino with Ancient Page Coal Black dye ink and heat set.


Apply colour with Sharpie markers using my 'Sharpie Domino Queen' technique. 
 For more info on my technique check out the following links:
 Check out my published article in Somerset Studio July/Aug 2003 issue, which is also up on my website Velvet Paw Creations.com.  I'm still busy re-designing my entire website but I'm getting there.  You can also see more of my technique via my blog's Project and Tutorials Index menu under


I sketched in a diamond pattern on her dress and then used Pomegranate and Black for her dress and the background and a combination of Black and Slate Gray for her hair, corset and gloves.


I hand drew a diamond design on all four sides of the domino and added gold dots with a fine point metallic gold paint pen.  I also added gold bling to her necklace, corset and ring as well.  I sealed all the surfaces with Judikins Diamond Glaze and attached a gold leaf shaped bail to the back of the domino with G-S Hypo Cement adhesive.  I finished off my DominoART pendant with a necklace made from plaid ribbon with a lobster claw clasp.


I also made a matching card and gift box which you can see on my blog, Leigh S-B Designs!


Stay tuned for Day 6 to see what Pat C has cooked up in her cauldron for you!

Domino Hugs!

THE SHARPIE DOMINO QUEEN

Related Posts Plugin for WordPress, Blogger...